
SETUP
SDK Tutorial
https://developer.sony.com/ja/develop/spresense/developer-tools/get-started-using-nuttx/set-up-the-nuttx-environment
Spresense SDK 開発ガイド
https://developer.sony.com/ja/develop/spresense/developer-tools/get-started-using-nuttx/nuttx-developer-guide
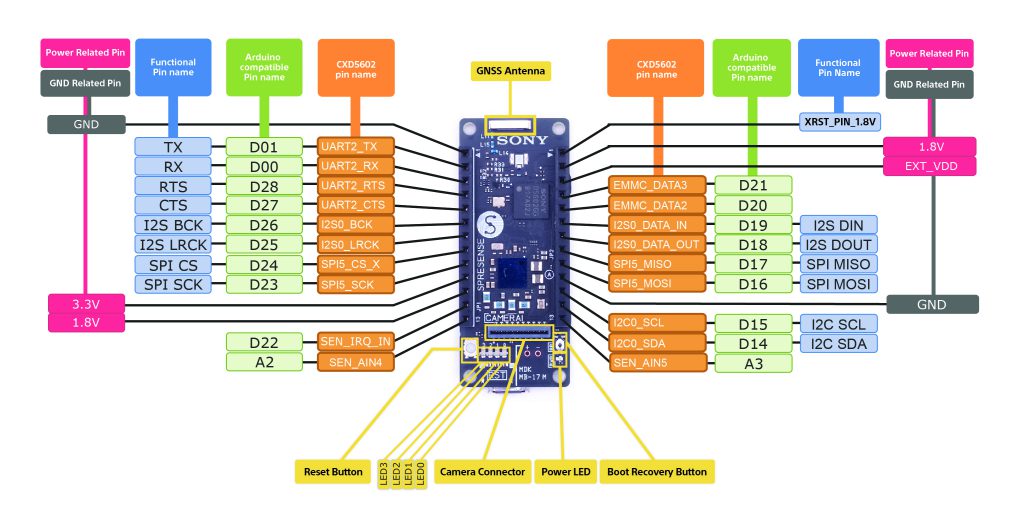
PIN
Windows Subsystme Linuxを使う
Ubuntu 18.04
下記フォルダで作業します。
cd /mnt/c/SPRESENSE
windowsの、c:\SPRESENSEです。
GCC ARM toolchain の他、必要なパッケージをインストールします。
sudo apt-get update -y
sudo apt-get upgrade -y
sudo apt-get installgit gperf libncurses5-dev flex bison gcc-arm-none-eabi genromfs pkg-config autoconf automake cmake
kconfig-frontends を取得し、インストール
git clone https://bitbucket.org/nuttx/tools.git
cd tools/kconfig-frontends/
./configure –disable-shared
make
sudo make install
Spresense SDK リポジトリからソースコードをダウンロード
git clone –recursive https://github.com/sonydevworld/spresense.git
USB接続の設定
sudo usermod -a -G dialout <user-name>
Kernelのビルド
cd spresense/sdk
tools/config.py -k release
tools/config.py -k -m
(設定の変更)
make buildkernel
SDKのビルド
tools/config.py default
tools/config.py -m
(設定の変更)
make
※ビルドが成功すると sdk ディレクトリ以下に nuttx(ELF形式の実行ファイル)と nuttx.spk(実機に書き込むためにパッケージングされた独自形式のファイル)ができます。
設定の変更
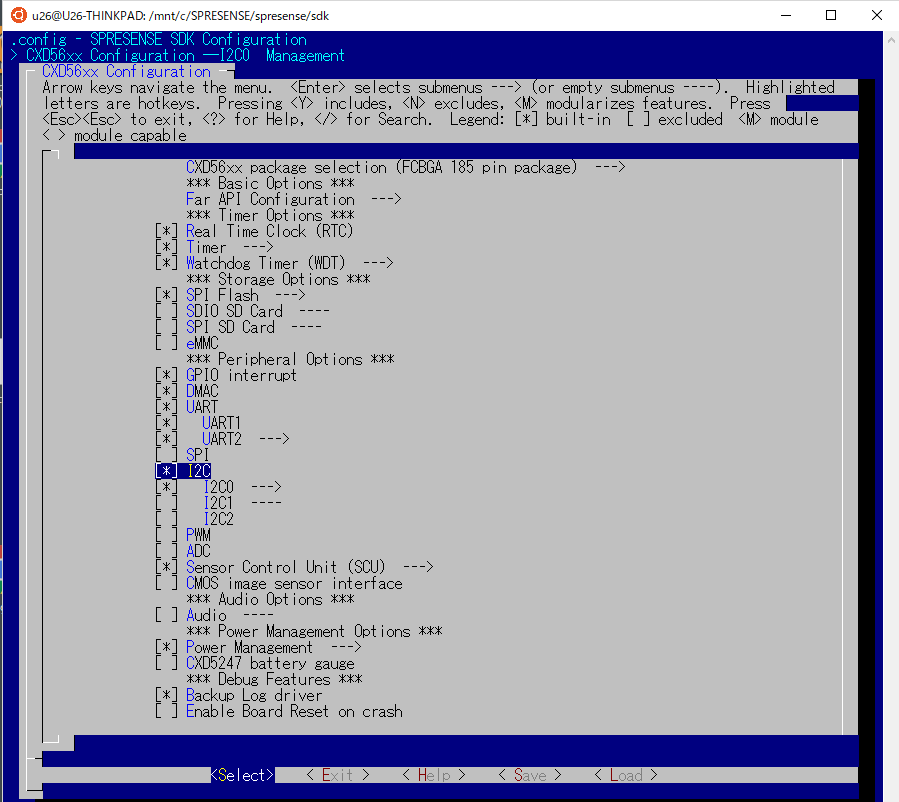
MENUCONFIG
tools/config.py -m
または、make menuconfig
[CXD56xx Configuration]
[Power Management]
[*] Dynamic clock control
[I2C]
[*] I2C0
[ ] SCU Sequemcer <= チェック外す。
[System tools]
[*] I2C Tool
[NSH Library]
[Scripting support]
[*] Support ROMFS start-up script
[ROMFS header location]
[*] Architecture-specific ROMFS path
※Dynamic clock control を有効にすると、システムは HV モード で起動した後に RCOSC モードまでクロックを落とします。定常状態では、RCOSC モードで動作します。
Sensor Control Unit (SCU) は、SCU デバイス内の SPI もしくは I2C バスに接続されたセンサーデバイスからのセンシングデータを取得することができます。CPUとは独立して動作するため、センサー取得に関わるCPUの負荷を軽減することができます。
起動スクリプトを作成する。(/etc/rc.S)
$ cd bsp/include/arch/board
$ cp ../../../../system/nshlib/rcS.template .
boardフォルダは、シンボリックリンク。
board -> /mnt/c/spresense/spresense/sdk/bsp/board/spresense/include
bsp/include/arch/board/rcS.templateの中身を下記に書き換え
nestra &
ROMFSを作成
※bsp/include/arch/boardに移動した状態
$ ../../../../tools/mkromfs.sh ../../../../
nsh_romfsimg.hができます。
sdkフォルダに戻って、ビルドします。
cd ../../../..
make cleankenel
make clean
make buildkernel
make
ブートローダーの書き込み
ブートローダをwindowsでダウンロードします。
https://developer.sony.com/file/download/download-spresense-firmware-v1-2-000
spresense-binaries-v1.2.0.zipを、
/mnt/c/SPRESENSE/にコピーします。
./tools/flash.sh -e /mnt/c/SPRESENSE/spresense-binaries-v1.2.0.zip
presense-binaries-v1.2.0.zipを解凍し、 gnssfw.espk loader.espkをsdk/tools/windowsにコピーしておく。
$cd tools/windows/
cmd.exe
(wineows)$ flash_writer.exe -s -c COM13 -d -b 115200 -n gnssfw.espk loader.espk
カーネル・SDKを書き込み
cd /mnt/c/SPRESENSE\spresense\sdk
cmd.exe
C:\SPRESENSE\spresense\sdk >
.\tools\windows\flash_writer.exe -s -c COM13 -d -b 115200 -n nuttx.spk
書き込み終了したら、exitでubuntuに戻る。
TeraTermでシリアルポートにつなぐ。
#SPRESENSEのターミナルにつなげる
sudo screen /dev/ttyS13 115200 -fn
I2C Toolの使い方
busのdump
nsh> i2c dev -b0 0 7f
readの例
CCS811をつなぎました。
nsh> i2c get -b 0 -a 5b -w 8 -r 20
nsh: i2c: too many arguments
READ Bus: 0 Addr: 5b Subaddr: 20 Value: 81
nsh> i2c get -b 0 -a 5b -w 8 -r 21
nsh: i2c: too many arguments
READ Bus: 0 Addr: 5b Subaddr: 21 Value: 12